It's never been more important for your website to be fast loading; particularly the Core Web Vital (CWV) metrics that Google has told us are a direct ranking factor.
But when it comes to assessing your page speed, if you're relying on Google's own tools, you might not be getting an accurate picture.
Many SEOs are taking a look at their clients' websites in PageSpeed Insights, and panicking over what they're seeing.
That's because what they're seeing is often disturbingly poor results, particularly the scores for Largest Contentful Paint (LCP) and Cumulative Layout Shift (CLS).
Our own recent experience of testing page speed scores prior to site launch has regularly ended up reporting lower scores than you would experience when using a real device.
But the scores also don't match up against the results being returned from Google's Field Data on Google Search Console.
So which was giving us inaccurate results? And if you can't trust Google's own tools to assess your page speed, how can you find out whether your websites are performing well on those important CWV metrics?
We'll tell you how in this article.
Article Contents
- Why Google PageSpeed Insights is giving inaccurate results
- An example of the Google Lighthouse problem
- A comparison of default network speed on Google Lighthouse
- How to get accurate page speed results from Google Lighthouse
- How to choose the right device for Google Lighthouse testing
- How to install Google Lighthouse on your device
- Running Google Lighthouse on your device
- Getting accurate page speed results with Google Lighthouse
At the end of this guide, you'll be able to accurately perform a page mobile speed test for your websites using a real device.
So you and your clients won't need to panic about the Page Experience update tanking your rankings - you'll be able to get far more realistic, representative results.
Why is Google PageSpeed Insights giving inaccurate results?
Google's PageSpeed Insights relies on an open-source tool maintained by the Chrome team called "Lighthouse" to generate its page speed scores.
But if you're testing a site using the full power of your PC then it's not going to be at all representative of the speed that you would achieve on a mobile device - and that's the score that Google (and all SEOs out there) are really interested in - after all, we know that Google is using the mobile version of a webpage when indexing your website and its content.
To counteract this, Lighthouse takes the full speed results from your PC and then applies an emulated slow down.
This slow down applies to both the CPU and network (bandwidth and network latency) performance.
But, from our research, the slowdown being applied is much too great, making it more like a worst-case scenario rather than an accurate reflection of what most mobile experiences would be.
Lighthouse is showing you the estimated speed results of you using an ancient phone with VERY limited data and bandwidth. And in most cases, that isn't going to be an accurate representation of how most mobile users will experience your website.
This won't always be the case
Each website has a different userbase, and some of those userbases will consist of a higher proportion of users with poor network speeds and/or using older mobile devices.
However, for websites that are mostly reliant on traffic from within the UK - as is the case for most of our clients - then we think the results from Google's Pagespeed Insights tool are largely inaccurate.
An example of the Google Lighthouse problem
One of our projects, Balloon Monkey, is a company that delivers inflated balloon gifts throughout the UK.
During development, we invested significant time optimising performance on the website, with the specific CWV metrics being a major focus during the development stage.
As we approached a launch date, we began testing performance as part of our pre-launch website testing. However, our testing of the Balloon Monkey home page through PageSpeed Insights gave us these results:
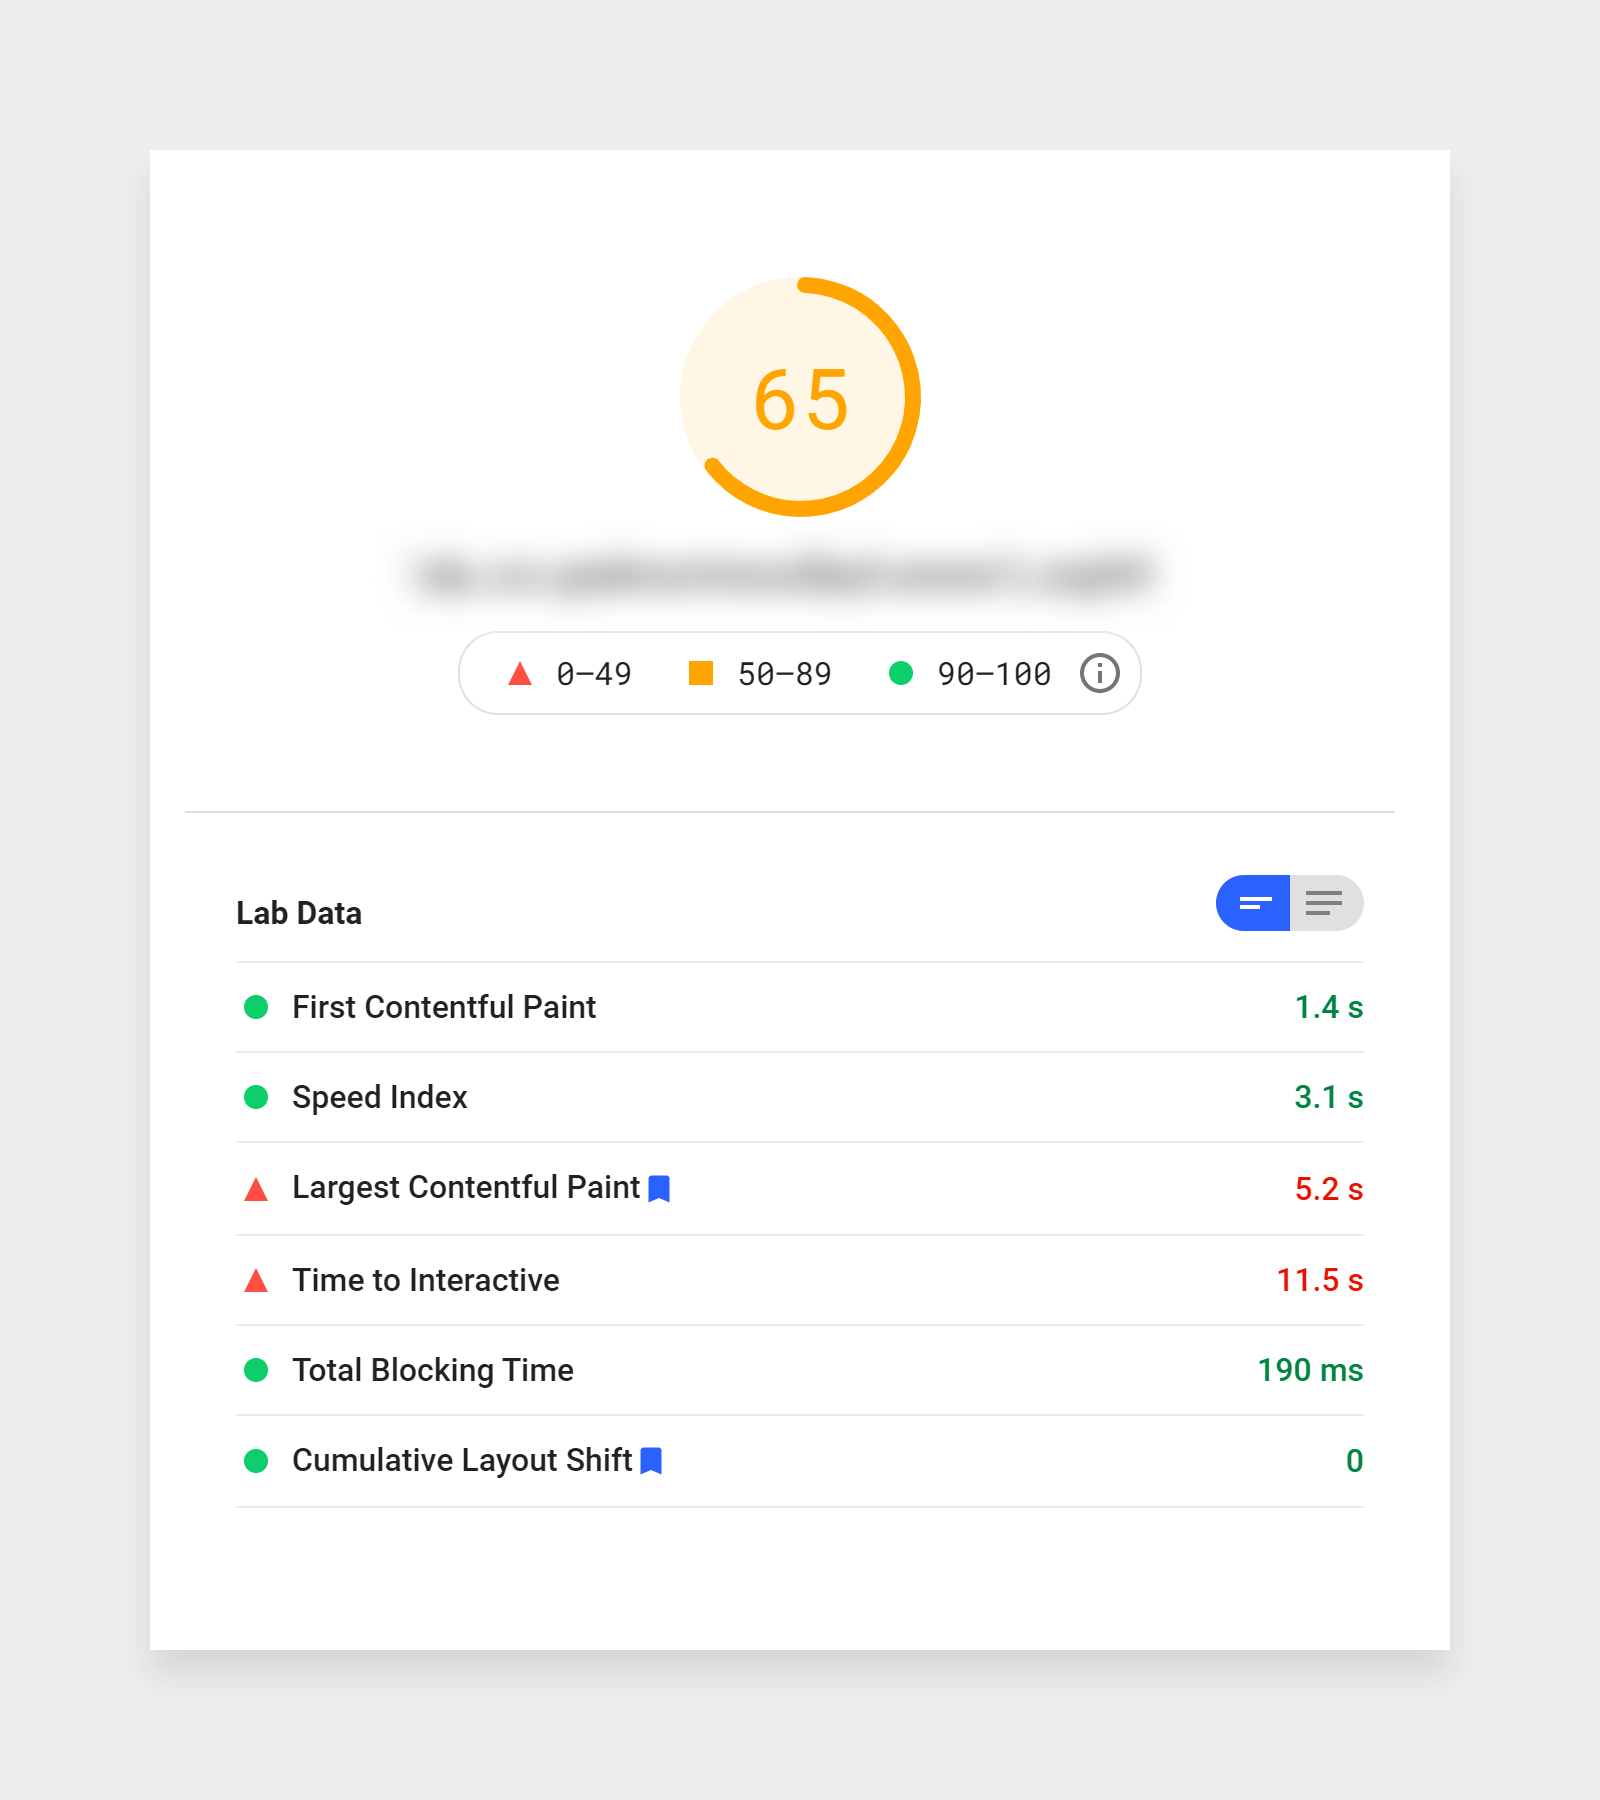
A huge LCP score of 5.2s left us scratching our heads
Despite following best practices to optimise the performance on the website, we were really disappointed by the results. An LCP score is showing 5.2 seconds would fail the Core Web Vital test.
Cue alarm in the Edge of the Web office! We know that the website performs well on mobile, and we've ground out every inch of performance we can from it.
We decided to launch the website and monitor Google Search Console, and see what that's telling us.
After a few weeks, we began to start seeing new field data from the website, which told a different story altogether.
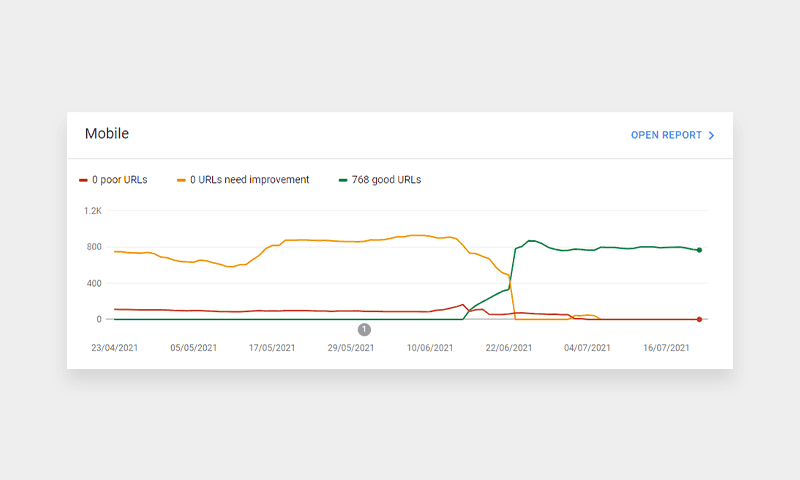
On the graph, you can see the precise point at which the new website went live, and when the new content was all fully indexed.
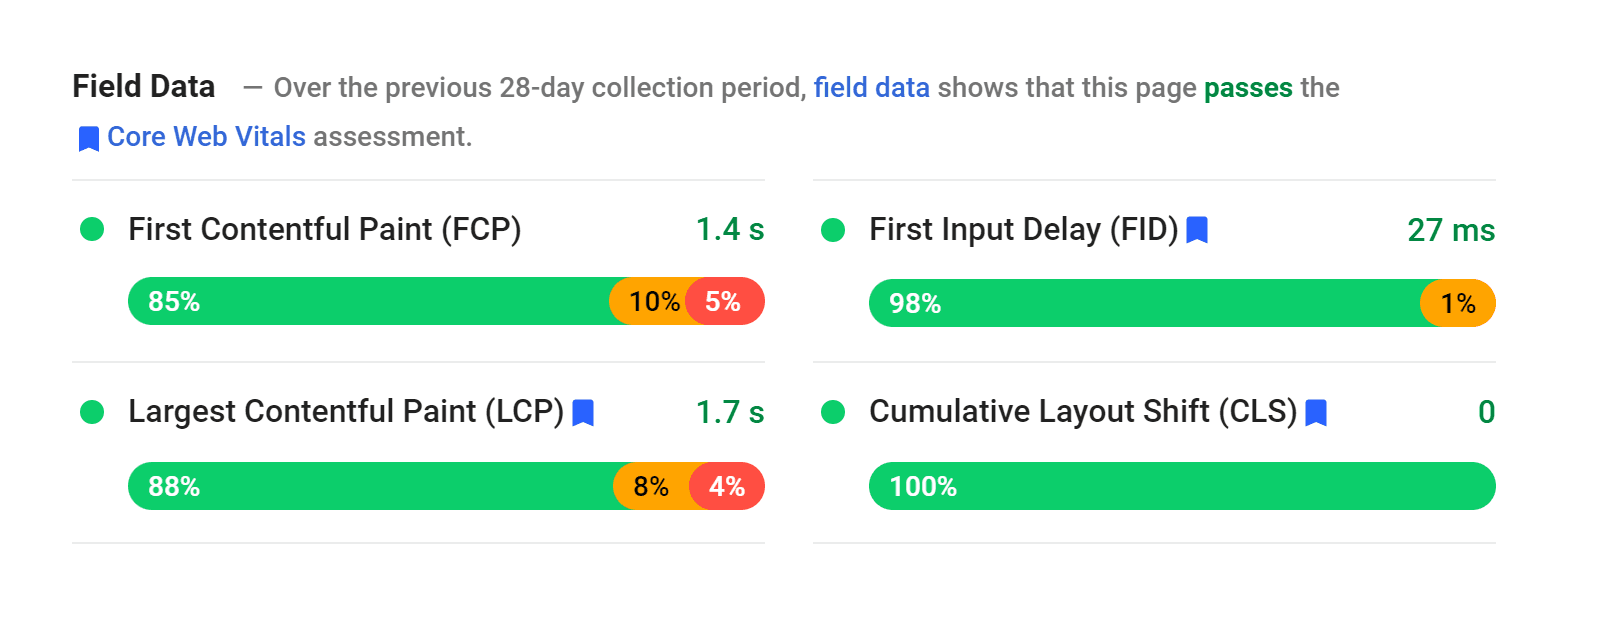
Field Data told us the website was passing CWV assessment.
So how do we know which measurements are actually accurate?
We decided to run the Lighthouse test again. This time, we installed the Lighthouse software directly onto a real mobile device - a fairly standard model that we'd expect to be a similar sort of level to most users.
We ran the test while connected to the internet via 4G.
Here are the results of that test.
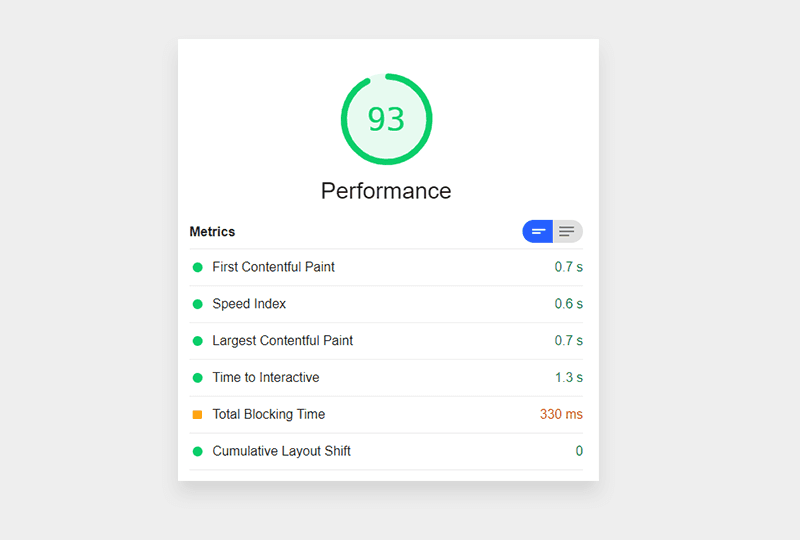
Testing directly with a mobile delivered results in line with our field data.
So, it was time to do some more digging, to find out why Lighthouse was giving us inaccurate results - and here's what we found.
A comparison of default network speed on Google Lighthouse
First, we looked into how Lighthouse emulates mobile devices to deliver its results.
Lighthouse simulates network speed using two key metrics: latency and download bandwidth.
Latency is the time between sending some data and it being received. This is usually measured in milliseconds (ms) and, naturally, the lower the time, the better the result.
Bandwidth is the amount of data that can be transmitted within a specific timeframe. This is usually measured in the number of megabits per second (Mbps). In this case, higher is better as you want more data transmitted within the timeframe.
The default values that Lighthouse uses for these metrics are:
- 150ms latency
- 1.6Mbps download bandwidth.
The problem is that these values are based on WebPageTest's definition of "Fast 3G" in 2018. That means that Lighthouse is basing its metrics on values that are way below the average performance of a modern mobile several years later.
For a start, 3G is no longer the most common network speed in the UK - the vast majority of mobile devices are now using 5G.
That means Lighthouse is simulating a mobile latency that is over 3 times slower and a download speed that is over 20 times worse than you would see in the real world today!
And this gets more extreme if we're comparing usage through WiFi, which is the other main way people browse on their phones.
Through a WiFi connection you can expect to be getting
- 24.12ms latency
- 66.38Mbps download bandwidth
This is 6 times faster latency and 41 times more bandwidth than the Lighthouse metrics!
And this is just the disparity based on average network speeds today. As 5G becomes more widespread and FTTP broadband begins to be rolled out, real-world devices are going to get much faster - leaving the Lighthouse simulation even further behind and less accurate than ever.
So, if PageSpeed Insights can't be relied upon to give you accurate results - how can you assess your website's real page speed performance?
For that, you need to download and run Lighthouse on a real device - and in this next section, we'll show you how.
How to get accurate page speed results from Google Lighthouse
To get a true picture of how your website performs on mobile, it's best to do your own testing on a real mobile device. But the process isn't quite as simple as just doing the test on your phone!
What you need to do is to make Lighthouse use a specific device for its analysis - a device that you know is a good representation of the average mobile user.
And the great thing about this process, is that once the initial setup is done, you can perform this test as often as you like for any websites or pages you want.
You may need a developer's help to get you set up, but it's well worth the initial effort!
Here are all the steps you need to set up Lighthouse on your device, so you can use it to get an accurate page speed analysis.
How to choose the right device for Google Lighthouse testing
First off, you want to choose a phone that is actually a fairly representative model. That's because we're doing a real-life test of how a website performs on this specific phone.
So there's no point choosing a state-of-the-art, super fast new model, as most people don't have a phone like that.
There's also no point choosing an ancient phone that barely works anymore, as that's likely to give you similar results to what you're getting at the moment.
Ideally, you want a mid range phone. Something that is a few years old and still has reasonably high usage.
Also, Lighthouse doesn't run on iPhones, so they're completely out.
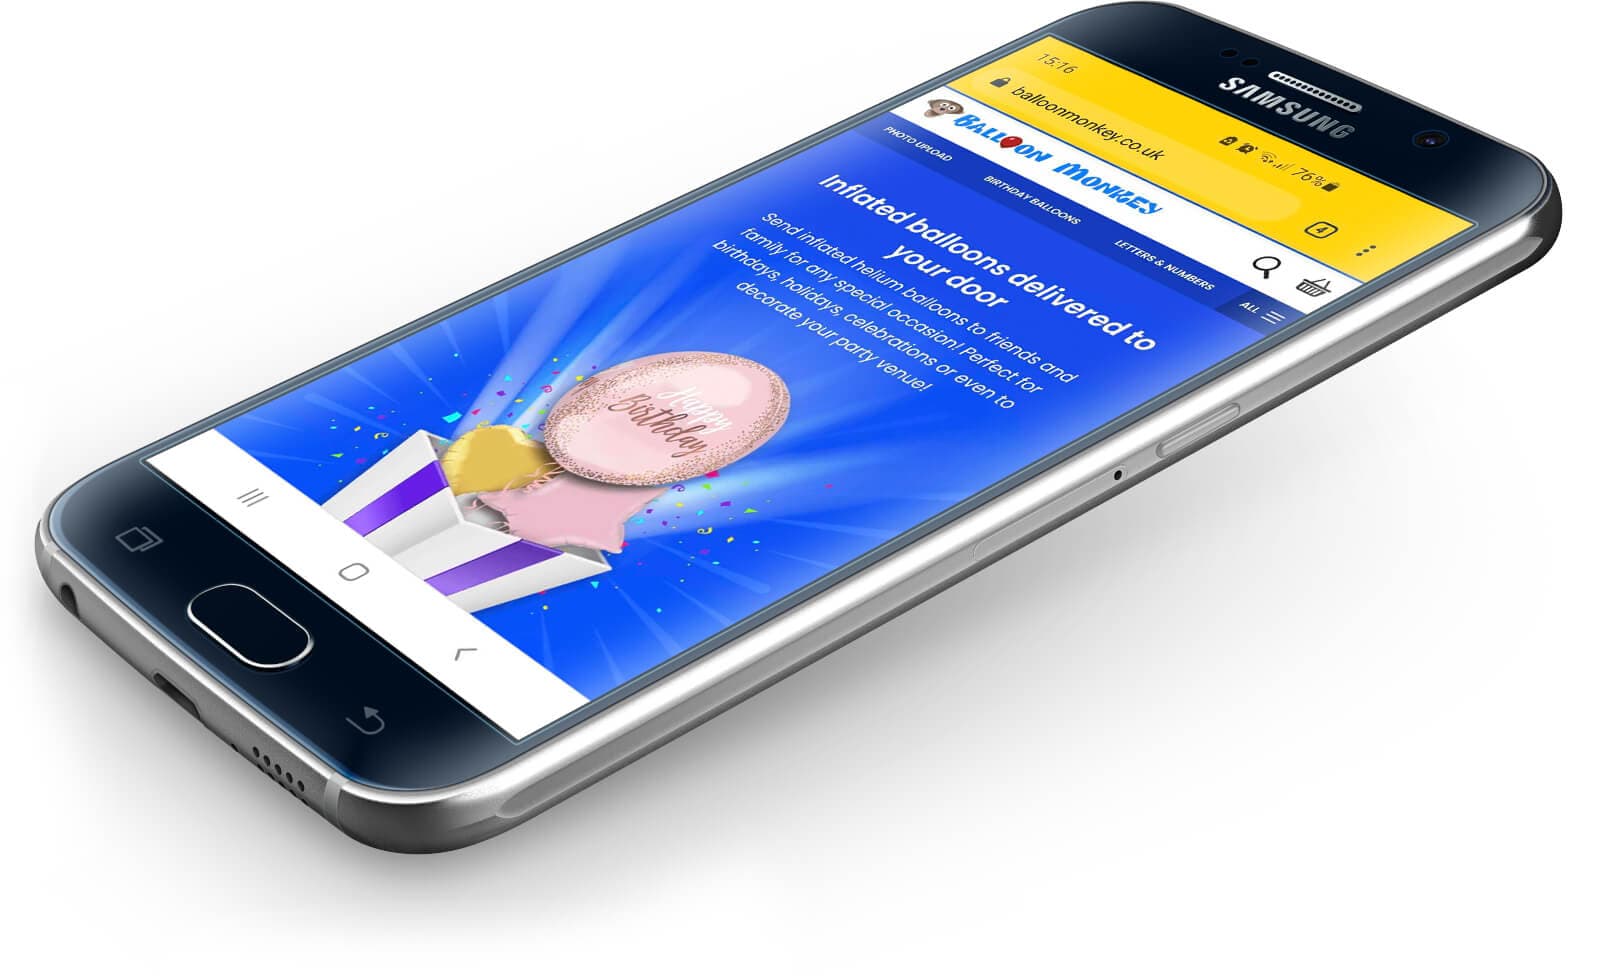
We used a Samsung Galaxy S6, which according to a YouGov survey, was still one of the most popular phones in the UK in 2021, despite being released in 2015!
How to install Google Lighthouse on your device
In order to run Lighthouse on the phone, you'll need to go through this initial setup phase.
Step 1: How to run a command line
Before we get stuck into the main process, you'll need to know how to run a command line - as that will be a key component of most of the next steps.
This is different depending on whether you're using a Windows or macOS computer.
How to run a command line on Windows
Open the start menu and search for "powershell". Opening it should bring up a blue window with white text.
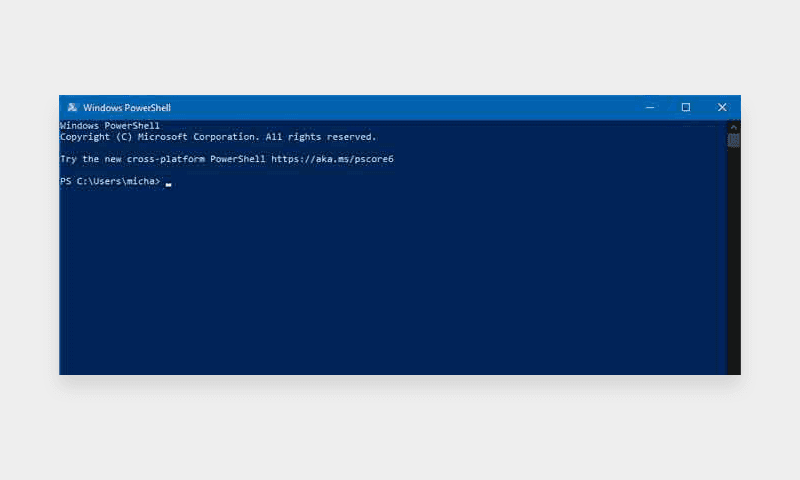
This is where you can enter the commands just as they're shown in this article.
How to run a command line on macOS
You need to open spotlight search by pressing cmd + space, and then search for "terminal".
Opening that will bring up a black window with white text.
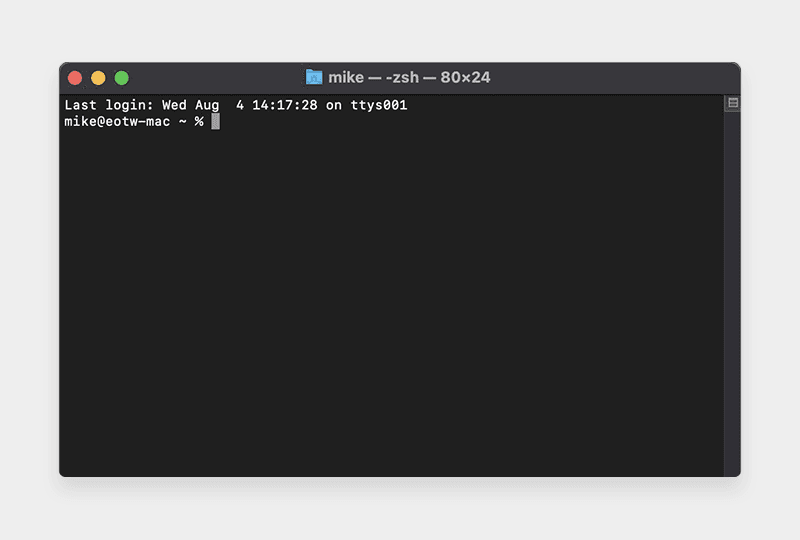
From here the process is exactly the same as for Windows users, simply enter the commands as they're shown in the guide.
Step 2: Installing Android Debug Bridge
Android Debug Bridge (adb) is a command line tool that is used to communicate with an android device.
There are two ways to install adb:
- Using the SDK Manager within Android Studio (this is our recommended option)
- Downloading Android SDK Platform Tools manually
Android Studio
You will need to download, install and run Android Studio on your desktop. It will download the correct platform tools on the first run, so this is the simplest way to get adb installed.
On macOS you may need to add adb to your path. You can do so by running the following:
echo 'export ANDROID_HOME=/Users/$USER/Library/Android/sdk' >> ~/.bash_profile echo 'export PATH=${PATH}:$ANDROID_HOME/tools:$ANDROID_HOME/platform-tools' >> ~/.bash_profile source ~/.bash_profileManual Download
You will need to download the correct version of the SDK Platform Tools for your operating system.
You can then extract these files somewhere and add the "bin" directory to your PATH environment variable.
Once adb is installed you should be able to run adb from the command line to see the adb help text. That will confirm it's installed and running correctly.
Step 3: Install node.js
Lighthouse is a javascript application so you will need to install node.js to be able to run it.
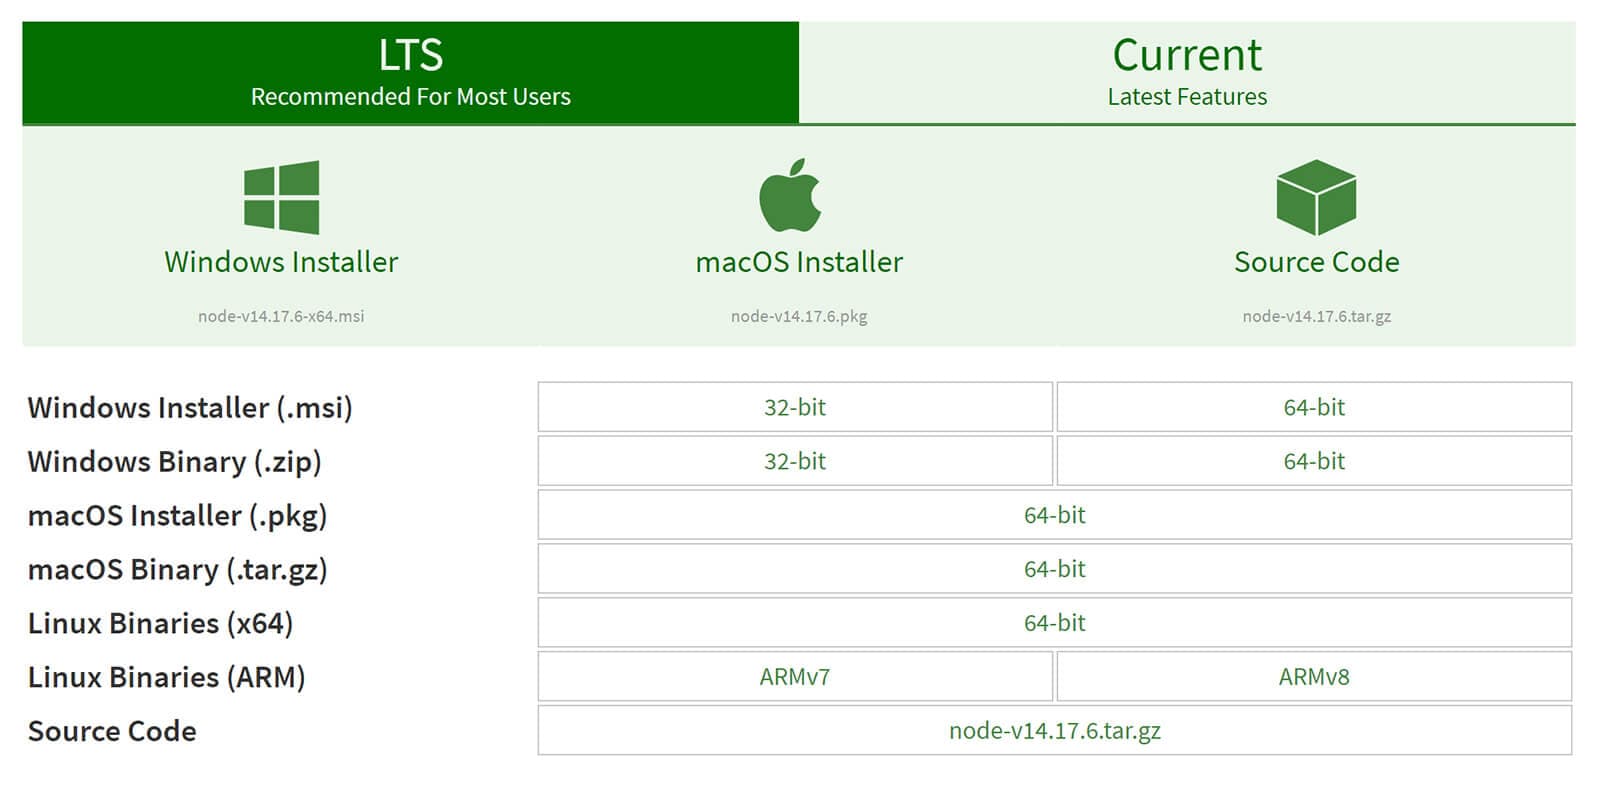
Visit the node.js download page and choose the appropriate installer for your Operating System (Windows or macOS). Make sure you select the LTS (long term support) version, as these are the only versions supported by Lighthouse.
If you're given the option to "add node.js to your path" you should choose yes.
Step 4: Install Lighthouse
Lighthouse will need to be installed from the node package manager repository.
You can install this by running the following command:
npm i -g lighthouseThis breaks down as:
npm- Node Package Manager, the executable used to install and manage packagesi- Shorthand for install-g- Shorthand for --global, telling npm to make this package available globallylighthouse- the package to install
This will install Lighthouse and make it available globally, meaning you can run lighthouse in the command line from anywhere.
You can test that Lighthouse is installed correctly by running lighthouse --version. It should output a version number, meaning it's all working correctly.
It's important to remember that this will install the latest version of Lighthouse, which will not necessarily be the same version as is on PageSpeed Insights or in Chrome DevTools.
You can also install a specific version if you want to.
Step 5: Enable Developer Mode on your device
The final step in this process is enabling Developer Mode, so that you can then enable USB debugging.
You can do this by going to "Settings" > "About Phone" and then tapping the "Build number" 7 times.
A message should appear to tell you you're a Developer.
Once you've done this, a new setting will appear under "System" called "Developer Options".
You need to go here, enable Developer Mode and then scroll down and ensure "USB Debugging" is enabled.
Running Google Lighthouse on your device
Now we've got Lighthouse installed on the device, it's time to run the program, which is a simple 3 step process.
Step 1: Connect to your device using adb
We will need to connect to our android device and run adb.
First, plug the device to your computer via USB cable.
Then start adb by running adb devices in the command line. At this point, you may see that your device is unauthorized.
$ adb devices List of devices attached 10e2313 unauthorisedNext, you need to enable USB debugging from your PC on your device.
A popup should appear asking you to allow USB debugging - you want to Allow this.
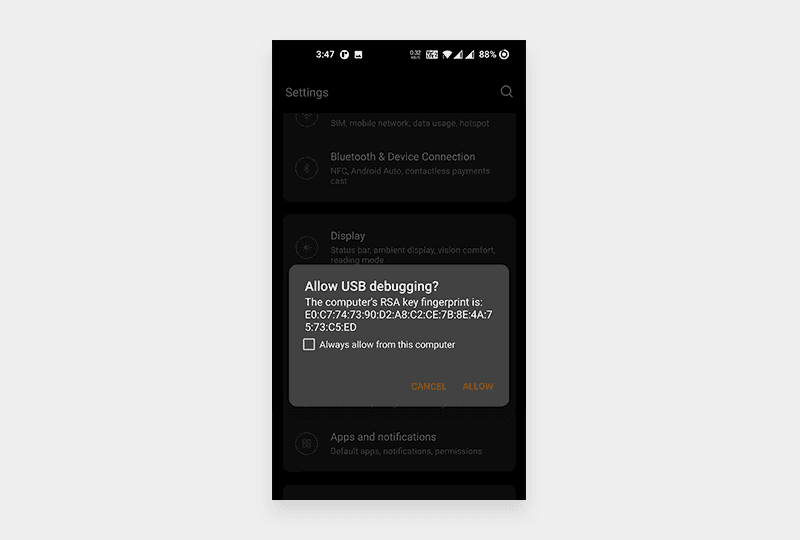
Running adb devices again should now show that the device is connected.
$ adb devices List of devices attached 10e2313 deviceStep 2: Configure port forwarding for adb to your device
Lighthouse connects to an instance of Chrome using the "Chrome DevTools Protocol". So we will need to forward a port from our computer to the port on the device that Chrome DevTools is listening on.
You can do this by running the following:
adb forward tcp:9222 localabstract:chrome_devtools_remoteThis will forward port 9222 from your computer to Chrome Developer Tools on your device.
If you've got more than one device connected, you may need to specify the device ID.
Step 3: Run lighthouse without any slowdown or emulation
Now everything's set up, you are ready to run Lighthouse on your device.
First, you need to be sure to run the test without any CPU or network slowdown - the whole point is that we're testing on a real world device, so we don't want to muddy the waters with additional issues.
So, make sure Chrome is running on your device and then run the following:
lighthouse --port=9222 --screenEmulation.disabled --throttling-method=provided --no-emulatedUserAgent --only-categories=performance --view https://www.edgeoftheweb.co.uk/This breaks down as:
lighthouse- The name of the program we want to run--port=9222- The port to find DevTools on (this is the port we forwarded to our device)--screenEmulation.disabled- Disable emulating a mobile screen and use the default viewport of the device--throttling-method=provided- This tells lighthouse that the throttling is being provided somewhere else, in this case from the device itself--no-emulatedUserAgent- Use the default User-Agent header from the device--only-categories=performance- Only run the performance audits, skipping SEO, etc.-
--view- Automatically open the generated report https://www.edgeoftheweb.co.uk/- The URL that we want to test - we're using our own website as an example.
You will get a prompt on the first run to ask whether to send analytics, just press enter to say no.
Lighthouse will then produce an HTML report and automatically open it in your default browser. This will show you the results of your test.
We highly recommend doing the test at least twice; once when you're connected to WiFi, and once when you're not. That will give you a good idea of site performance for people whether they're using their data or a WiFi connection.
Getting accurate page speed results with Google Lighthouse
And that's it! Now you're all set up to run your own page speed tests, and to get much more accurate results based on a real world device, and not the worst-case scenario that PageSpeed Insights defaults to.
To give you another example of the differences between the results, here's what we get when testing our own home page on a variety of page speed analysis tools, and in-house on a mid-range mobile device:
- PageSpeed Insights - 64
- web.dev (this is another page speed analysis tool that uses Lighthouse) - 64
- Chrome DevTools - 70
- On Device (WiFi) - 99
- On Device (4G) - 82
As you can see, the scores are quite dramatically different and while, of course, our in-house testing has its own caveats - such as the phone itself, the WiFi strength and the 4G connection, it's a much more accurate picture of what the average user will experience.
It's also always a good idea to cross-reference with Google Search Console, just in case you do have any pages that are failing the Core Web Vitals checks.
So, if you've experienced poor CWV scores when using PageSpeed Insights, it might not be as big of a problem as you imagine.
Use our method to accurately test page speed in a real world scenario, and find out the truth about your website's loading times.

